As we established last week, while the standards are the same for everyone, each program has a different thought process, different activities, and their lesson for that standard will be completely different.
 Some books may introduce the concept of a number bond and call it a “math mountain” or they may call it decomposing. Some books don’t use model drawings and have children do a quick draw (which is not as universally applicable). The Common Core Mathematics Companion by Corwin Press is a great resource to help teachers know what the standards say, what they mean, and how it should look in the classroom (click here to read last week’s post!), but with all the different parts to the many math programs used by schools, planning lesson to lesson can be overwhelming.
 When thinking about lesson planning, there’s a group of teachers (typically found in elementary school) we call Page Turners. These dear teachers get their name because they are so overwhelmed by all the different subjects that they rely solely on the book to teach math, just turning the pages and doing exactly what it says. The Page Turner measures success in how many pages of the book they’ve covered and how much they’ve exposed their students to the curriculum. We’ve all probably been there at one point in our career!
However, as we know, delivering of the curriculum (the standards) doesn’t always mean that children will retain concepts to the application level or develop any depth of understanding. Even if we do follow the book exactly the way it was written, we can be under the illusion that our students are actually understanding what’s going on until it’s time to complete an exit ticket.
Part of the reason for this is that the math books don’t really help you backwards design lessons to meet the needs of your students. They are also not consistent about incorporating concrete, pictorial and abstract (CPA) means into the lessons to help your students fully grasp the concept. Books and programs tend to aim their lessons and activities towards the average, perfect classroom, leaving only small call-out boxes in the text about how to differentiate for the accelerated or remediation-level kids in the group. However, if 97% of your class is at-risk, struggling, or below grade level, how do you go about helping them access the standards?
Sometimes, we plan our lessons in a more reactive way instead of proactive way. For example, you may teach an entire lesson on repeated addition as it appears in multiplication and division for a 3rd grade classroom. You may give an exit ticket at the end of the lesson to see who gets it and who doesn’t. Then, you pull groups back for reteaching and repeat the cycle. This process of teaching, while traditional, is a reaction to students not getting the concept. Instead we want to shift our focus and proactively look at students’ misconceptions while thinking of the end in mind before we plan our lesson delivery. That brings us to the value of backward designing math!
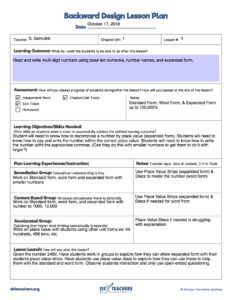
 Regardless of the math program you use, the backwards design template (get the fillable PDF version of the template in our store for $1.99!) that we use in our schools is designed to help you mold your mindset as you think about planning for your lessons, rather than serve as a complete lesson plan template.
Backwards Design in Action
Let’s say a teacher had just finished teaching a place value lesson and was preparing to give her students the exit ticket. She had written a variety of digits on the board and asked the students to create two six-digit numbers, compare them, and then write it out in word form. It was an exit ticket based on the lesson she’d taught previously, and it was appropriate for the lesson, but she didn’t take into consideration the students in the classroom. Most of the students were struggling with reading and writing the number so they couldn’t complete the place value exit ticket.
This lesson would have looked very different with some backwards design! With time spent planning and reflecting on where students had been challenged with this lesson in the past, considering the needs of her current class, anticipating misconceptions, and preparing to use CPA tools strategically during the lesson to really reinforce the concept in a variety of ways, the lesson could have been much more successful.
If the student isn’t understanding how place values work, there’s not reason for them to muddle their way through the exit ticket. For example, even the simple act of having place value strips available to students (even if every student didn’t need them), could have made a big difference in this lesson. For an interim activity, they could look at the concept and then ramp it up into the hundred thousands and then, the middle of the road could draw a picture, and the higher group could be making the number in different ways (for example if I did four hundreds, two tens and five ones, the number could be written as four hundreds and twenty-five ones).
 When we backwards design a lesson, we have the opportunity to look at the scope of how we’re going about implementing the lesson from the beginning. Many of us have been teaching math in our specific grade/age range for a long time, so it’s never a big surprise what part of the lesson students don’t get. We usually have a good idea of what misconceptions they will bring to light. The goal of backwards design is to take those issues we know kids will have and step back for a minute, keeping the kids at the forefront of our planning. Let’s walk through that process, section by section…
(Click here to download the example PDF)
Learning Outcome
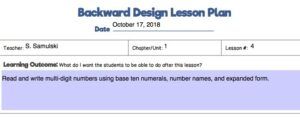 We start with the end in mind. Once this lesson is done, what do I want the students to do? This objective should be written based on your understanding of the what the standard says. If you go into a lesson in your book, note the objective and the related standard and it doesn’t make sense, pull out the Common Core Mathematics Companion to see what the standard means and what it looks like!
- Do you want kids to be able to decompose and make a 10 with manipulatives?
- Do you want students to be able to divide with the strategy of partial quotients?
Assessment
 From there, instead of going right into planning the lesson like we might normally do, embracing our inner Page Turner and going to the next page, let’s see about starting with the end in mind. Look at the chapter (or module or unit) test (or tests), quizzes, etc. and ask yourself:
- Where does this standard appear in these activities?
- How are is the test/quiz asking the questions about this concept?
- What are the essential pieces that the student needs to understand based on the objective?
Go through the independent activities included in your book as well, problem sets or the math boxes or any other independent work or exit tickets that the students might be doing or working on. Analyze those elements. This process could be like looking through binoculars. When we look through all the elements of the unit at first, everything seems kind of blurry, out of focus and overwhelming. Once we focus on the standard, we can see traces of it in all the activities and we can see how it’s presented to students throughout the unit – assessment, independent practice, etc.
Learning Objective
 Reflect on what happens every year when you teach this lesson. What happens? What do the students say? How will they misunderstand you? What misconceptions have students had in the past? You can also think about the prerequisite skills students need in order to achieve the objective.
A few examples:
- Think about subtracting the traditional way with regrouping across zeros. We’ve all seen what happens when kids do this! Usually, they go and change or rename the numbers but they forget to change the value of those numbers. That’s a common misconception kids have then they’re subtracting.
- Thinking about kids working with decimals. They often forget the place value or forget the placeholder when adding or taking away numbers from a decimal.
If you’re new to the grade, the Common Core Math Companion is a great place to start because it spells out the standards complete with the misconceptions kids have for many years and it even gives examples. Before I’ve even planned a lesson, I should already know what the end result should be. I know what my expectations are, what skills my kids need to have and what misconceptions they are going to have.
Plan Learning Experiences/Instruction
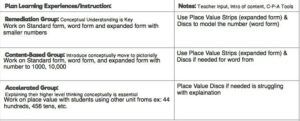 Now, we plan how those activities you selected that align with your standard will look, whether you’re doing whole class instruction or guided instruction.
- What are remedial level students going to need help with?
- How can you make the objective a little more conceptual?
- What will it look like for the middle of the road kids that are ready to receive content as its available going to do?
- What will it look like for accelerated students?
In a guided group, what materials do you need to integrate to help students concretely, pictorially, and abstractly understand the concept?
- If we’re working with decimals and I am adding or taking away decimals in different places, I’m going to make sure I have the place value strips accessible.
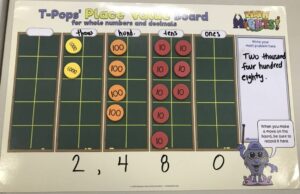
- If I was going to look at regrouping across the zeros, I might want to show kids that compensation is a great strategy and T-Pops Place Value Mat. I could actually have those kids build the numbers and see what’s happening when they regroup.
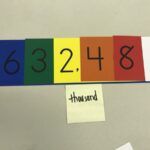
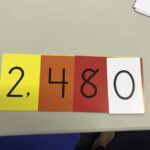
If we were doing this lesson for small group, we could have the place value strips going up to the hundred thousands, but as kids are reading it, they could see the post-it note that reminds them when they’re in the thousands. They can drag it out to see that it’s in the thousands places as they’re reading, and then they can write it.


We could also show this with place value discs.
Lesson Launch
![]() This is what we start with when we plan traditional lesson plans, but with backwards design, this is the lesson launch is the last part you do. When you start to plan the Lesson Launch, the goal is to make it inquiry-based and student-led.
This is what we start with when we plan traditional lesson plans, but with backwards design, this is the lesson launch is the last part you do. When you start to plan the Lesson Launch, the goal is to make it inquiry-based and student-led.
- How am I going to tap into the interests of the students I’m teaching on the subject I’m about to teach?
- How am I going to use that lesson launch as a dangling carrot to see how well those students actually understand that standard?
- What are the things they they know from before or after?
Exit Ticket
Think about what you want the students to do to show you if they actually met the standard you were teaching. This activity should show you their mastery or what areas they are still struggling in so that you can look at that lesson in a different way going forward.
Empowering Teachers
Working through the backwards design template for lessons helps teachers feel more prepared. You can take the lesson as it’s written, but then spend time processing, looking at it differently yourself so you can add in any needed elements and minimize the need for reteaching.
It’s not a quick or easy process, but putting in the time to plan up front saves you time in the long run because you can address misconceptions before they happen.
After backwards designing a lesson or cluster of lessons, some of our teachers like to put a label inside their teacher’s manual to help them remember things that the book didn’t say to use but worked really well. For example, ”use the Counting Buddy or a Rekenrek instead of unifix cubes for 1st grade” or “use place value strips here.”
Taking it to the Next Level
Two heads are always better than one, so after you’ve taken the time to thoughtfully backwards design a lesson, after you teach it, the next step is to collaborate with a colleague. Debriefing about what worked and didn’t during the instruction will help you improve the lesson even more for next time you teach it. It may also help you realize you need to put on the brakes and tweak some things in the lesson to make it more accessible so that when it comes time for an exit ticket, more than two kids actually meet the standard.