Ever felt like banging your head against the wall teaching rounding? You’re not alone!
Many students memorize the old “underline the place, look next door, 5 or higher round up” rule without truly understanding why they round up or down. And even when students can follow the steps in a guided activity, they often struggle to apply the skill independently.
If you’re a teacher (or parent) looking for ways to make rounding meaningful, this post is for you. Understanding rounding is more than a procedure—it builds number sense, estimation skills, and confidence in problem solving. Let’s explore how to make it concrete, visual, and accessible for all learners.
Why Traditional Methods Don’t Always Work
Most students learn rounding like this:
- Underline the digit in the place you’re rounding to.
- Look at the digit “next door”.
- If it’s 5 or higher, round up; if it’s 4 or lower, round down.
For some kids, this works—but often, they’re just memorizing steps. I observed a third-grade classroom where students practiced rounding in a guided station. They seemed fine with support, but back at their desks, they struggled to apply the concept independently.
We’ve seen it in many classrooms – rhymes and tricks do not equal understanding.
")
Using an Abacus to Make Rounding Concrete
Instead, a visual, hands-on tool (like an abacus) can help students WHY they’re changing numbers.
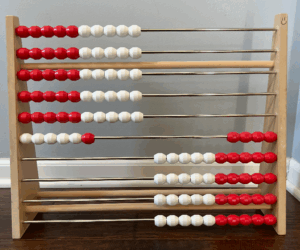 For example, I worked with a student rounding 156 to the nearest 10. We used one abacus to represent the 50–60 range. I asked:
“Is it quicker to push all 6 beads back to 50, or just push 4 beads forward to 60?”
He immediately understood that rounding up was easier, and just like that, he knew 156 rounds to 160.
After a few guided problems, he was able to use the abacus independently and explain his reasoning. His response?
“Is that what they were trying to explain with the five-and-higher, four-and-lower rule?? This way is way easier!”
Some students need a concrete representation to visualize rounding, while others can use number lines or mental strategies. Either way, articulating the why behind the rounding decision is key.
Step-by-Step Strategies
Here’s how to make rounding visual and concrete for students:
Using a Number Line:
- Build the number (with place value strips).
- Identify the benchmarks. (60 and 70).
- Find the midpoint (65).
- Which benchmark is closer to the target number?

Using an Abacus:
- Represent the range of numbers on the abacus.
- Ask: “Would it be quicker to move beads forward or backward?”
- Adjust the beads and round to the nearest endpoint.
Rounding with Decimals:
- Example: Round 4.67 to the nearest tenth.
- Endpoints: 4.6 and 4.7; midpoint: 4.65.
- Visualize using place value discs or a modified abacus (each bead = 0.1 or 0.01).
- Determine which endpoint is closer and round.

Differentiation Tips
- Concrete learners: Start with abaci or place value discs.
- Visual learners: Use number lines and midpoints.
- Abstract learners: Encourage mental rounding, then explain reasoning.
Gradually transition students from concrete tools to abstract reasoning as their number sense develops.
Resources to Support Your Teaching
We’ve created a Place Value: Rounding series (free for M³ Members!) that includes:
- Video tutorials and PowerPoint presentations for rounding to nearest 10, 100, 1000, and decimals.
- Both abacus and number line strategies to visually reinforce rounding.
- Accountability sheets for guided practice and reflection.
Tools to Try in Your Classroom
- Place Value Strips – Help students see and compare the value of digits across places.
- Abacus – A concrete tool that lets students see why a number rounds up or down.
- Rounding Number Line Template (Free download below!) – A visual support to help students plot numbers, find midpoints, and decide which endpoint is closer.
Try a quick rounding exercise as a warm-up—even virtually! Use Google Slides or Docs to plot points on a number line, or have students record a Flip Grid video explaining their rounding choices. Emphasize explaining their thinking—often more important than just getting the right answer.