So many resources stored in so many different places, so little time! One of the biggest universal frustrations of teachers seems to be finding the things they need.

Missed an episode? See the whole Instruction by Design Series here.
This document is stored in the Google Drive, then you have to go to the school documents on your school’s intranet, a curriculum mapping site contains the rest of what you need, and THEN you still have to download the game or activity, print it, and prepare it (laminate, cut, collate, etc.) for use in the classroom. All in your “spare” time!
When it comes to planning curriculum, we usually have the best intentions, but, in my experience working with teachers, this scavenger hunt for the necessary resources is what stops the implementation of good curriculum.
Good curriculum contains many components that we know to be best practice in math. My goal is always to really consider the issue and then how we can strategically intervene, which is why we are called Strategic Intervention Solutions. And so, once we had the standards mapped out and the assessments in order, we knew we needed to find a solution to this fragmented storage system as we pulled together the rest of the components of quality math instruction for our M³ project schools.
We also needed a resource that would support the turnover of new teachers in a school district. When a new teacher gets hired (sometimes in the middle of the year!), they receive the math book as the curriculum and start working their way through. They have to stumble through finding the supporting resources, typically by trial and error, and are frequently left frustrated. We wanted this resource to contain the curriculum that we so carefully mapped out! We wanted something to be able to put into a new teacher’s hands that contained all the documents we were using, plus the supporting resources (in this case, Eureka Math), so they could find everything as they needed it in a cohesive manner.
The districts that we were working with on this instruction by design project have a new ELA curriculum, they’re rolling out a new writing thing, AND there’s a new science thing. For an elementary teacher to put all these things together, along with our new math curriculum, and actually implement any of it successfully, is practically impossible. I felt very strongly that we had to package our math curriculum in a way that teachers could have things at their finger tips but not in a “stand and deliver” kind of way.
The Solution to the Problem!
 Enter: the mini binder. I got this idea where many good ideas are born – Target. I saw these cute 5×7 mini binders thinking I’ll use that someday! I had them sitting in my office for some time and had a few different ideas for using them that never came to fruition. However, once I realized they made clear sleeves for this size binder, I knew it was time for the mini binders to step up to the plate.
We needed a resources that had everything teachers needed in one place, and we chose to use a mini binder because it fits in your hand and you could technically hold it while you’re teaching. We planned one mini binder for each 10 weeks, and divided it into sections that corresponded to the different sections of our curriculum so it could be a quick reference guide for teachers in action.
Standards
 We began the mini binder the same way we began planning the curriculum – with the standards. The districts we were working with had a master document on their Google Drive with all the essential questions, vocabulary words, etc for the units of study in math. But that’s not handy when you’re in front of a class. So, we put the essential question(s) for the unit right in the front of the mini binder, easily accessible at any time.
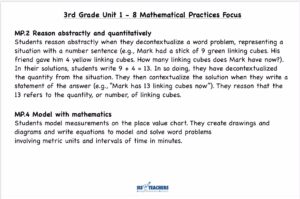
After the essential questions, we listed out the color-coded standards that we’d already outlined for the unit, complete with the green checkmarks, blue circles, and yellow diamonds to show the priority level of each standard. On the next page, we mapped out the 8 mathematical practices and, specifically, how they would relate to the current unit.
Having this section first in the mini binder helps teachers keep focused on the curriculum while they’re in the midst of their unit!
Number Talks
We’ve done lots of work with our project schools on number talks (based on the work of Sherry Parrish), and particularly what it looks like with at-risk kids. We wanted these at-risk kids to get to the point of being able to do mental math. We know number talks are a great way to help our students internalize math strategies, however, they aren’t usually implemented as consistently as they should be. Pressures of limited classroom/instructional time are a major factor, as with anything in education. The day just gets busy and, well, we just keep using the same strategies we’ve always used because we don’t have time to prep something new. This can become pretty mundane in the classroom, however, if we keep doing the same thing over and over.
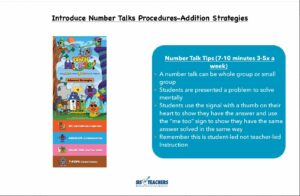
For this section of the mini binder, we wanted to collect all the information and resources teachers would need to effectively implement a number talk. There are a million different moving parts in the classroom, but if it’s all outlined for me in my mini binder, I don’t have to worry and I can know exactly what my numeracy talks are going to look like.
We included the exact numeracy talks the kids would be doing, with explicit instructions for what tools the students would need and what tools the teachers would need. Because these schools we were working with have adopted the Math Mights process, the students are familiar with the characters that represent the three ways, plus the traditional, to do addition and subtraction from using the posters and the downloads. So, for the number talk section, we included a description of the Math Mights characters as a reminder. Then we included sample problems the teachers could use that would lend themselves to whichever strategy was being covered – addition with compensation or partial sums for example. How many times have we thrown a problem up on the board only to realize, often too late, that it doesn’t really lend itself to the strategy we’re working on? We didn’t want that to happen for our teachers!
The number talks didn’t always match the standards for the unit exactly, of course. If you’re working on geometry, you’re still doing number talks for addition and subtraction. Sometimes students were just working on the numeracy number talk for conservation to ten.
In the upper grades, they still review addition and subtraction strategies, because they still apply to decimals and fractions, but sometimes we included certain number talks that were just on the three ways plus the traditional for multiplication or three or four ways to do division. Sometimes, depending on the standards, we threw in some fraction number talks. But each number talk was outlined in detail in the mini binder so the teachers were really equipped with the resources they needed to support their implementation of this important element of math instruction. We even had reminder boxes sprinkled throughout with tips and tricks and reminders, such as, “Remember, when you’re doing number talks, put your thumb on your heart!”

Some units are longer than others, and we did leave some wiggle room to address the needs of the student population. As we started training for the implementation of the mini binders, we talked about how to adjust if, for example, you give your students a problem like 400 – 199 and they look at you like deer in headlights. They don’t get it, they can’t mentally compute 400-199, and obviously don’t have a good strategy to solve that kind of problem. So, that week, you might do a strategy talk on Springling and counting up on an open number line, and show them how that strategy could help them solve that problem mentally. Then, you can pick back up on the number talks as outlined in the mini binder.
Problem Solving
Problem solving is one of the main things we teach when it comes to solving word problems. In the past, we’ve done coded math journals with our districts as a succinct, research-based way to approach word problems. We knew we wanted to design these into our units.
In Eureka Math, we found the rigor level of some of the application problems was so high that it was taking 45 minutes to complete one problem in the classroom with a population of at-risk students. In order to build sustainability of word problems and get kids to the level of comprehension in order to do various model drawings (tape diagrams, bar models, unit bars), we needed to be more strategic about the way we selected the “word problem of the day.” Of course, students will do more than one problem a day. They will encounter story problems in their problem sets and on assessments, but we wanted to have at least one strategically-selected exemplar problem that teachers can use to help students learn how to do the various types of problems. Our coding system has helped teachers really understand the types of problems, and so we knew we needed to incorporate in our instruction by design process for both students and teachers.
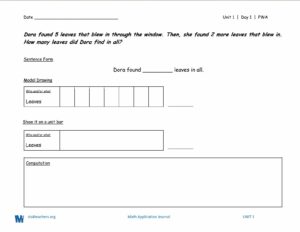
For students, we created a coil-bound journal for each quarter (units 1 and 2, at this point) that has one problem on each page with space to process and work through the problem. The journal has a step-by-step model drawing checklist (download the checklist for free!) in the front as a quick reference for students as they work.
The pages in the journal are coded by problem type and labeled by unit and day. We left flexibility, because we knew teachers might not get to a problem every single day, or they might get to two problems a day. We also scaffolded the problems to where, at the beginning of the year, a second grade student might have three part-whole addition problems, then three part-whole subtraction problems and then a mix of the two to really make sure they understand how to do the model drawings for each. Fastforward to a third grade classroom, they might be doing a mixture of part-whole addition, part-whole subtraction, missing addend, and we might throw in an additive comparison problem to help the kids to be able to come up with a way that they can grab onto that type of a problem.
For the teacher, I wanted them to have everything they needed in the mini binder so they didn’t have to go find their journal every time they are at the front of the classroom. I also included reminders – Do you have your model drawing poster up? Do kids have their checklists? The pages are in clear, plastic sleeves so teachers can use post-it notes or dry erase markers to keep their place. Then, each page of the teacher’s mini binder shows the problem the students have in their journal and then the answer key.
One of the major challenges we’ve faced with implementing our journals in the past is that, let’s face it, some of these problems are just hard, even for teachers that have been doing this for a while! With everything going on in classrooms, sometimes the teachers are reading the problem for the first time and trying to figure it out in front of the students. If our teachers are worried about how the model drawing looks because they’re building their own skills, they aren’t as confident, which can rub off on the students. I wanted the mini binder to help them feel confident!
 However, instead of just including all the answers and solutions, I decided to leave three empty boxes on each page. At the end of the day, teachers (like students!) aren’t going to get better at model drawings if they don’t develop their skills. So, in the training we had in preparation for implementing this curriculum, we had teachers collaborate together in their grade levels to look at problems together, ask questions, struggle through difficult problems together and collaboratively coming up with model drawings that were going to help students. These were the answer the teachers wrote into their mini binders. Once teachers had the problem and the model drawing, they could focus on the questioning, which is a really important part of problem solving. What are we going to do next? Where should I put the bar? Where should I put the label?
The whole process empowered our teachers that might not have felt comfortable with math and model drawings to have the tools necessary to help their students. The teachers have the answer key, but they aren’t just regurgitating it out of a book. They are able to internalize the problem and feel confident that they are doing so correctly so they can better help students with it.
We’ve found that 80% of the math programs we work with don’t include any type of strategy other than guess/check or a quick comparison to help teachers with story problems. These sections of our mini binder ensure that we can blend number talks and strategies into any math program, which is what makes us unique. Number talks have really been the bread and butter of our training at SIS4Teachers. We consistently promote number sense, so a big portion of our training revolves around having number talks infused into the curriculum, regardless of what math program you have!
Next week, we’ll look at the most fun sections of the mini binder – CPA and Games!