Do you have a rekenrek in your classroom??
 You might have heard of a rekenrek in the early childhood world of math. You may even have them in your classroom! However, I know a lot of teachers that have rekenreks, but will sheepishly admit that they’re sitting on a shelf and have never been used before. Why is that?? you might ask.
What I’ve discovered, as I work with teachers in our Molding Math Mindsets training, is that many teachers just haven’t had the time to really understand what a rekenrek can do.
They might understand the abacus, as it relates to subitizing and telling how many? without counting within 100. They might even understand the very basic application of a rekenrek in a numeracy talk on conservation to 10 or to 20. But that’s about it. I remember presenting eight or nine years ago, and everyone said reken-what?? They had no idea what I was talking about when I talked about the rekenrek. In fact, many of the teachers at that time had never even heard of a rekenrek, let alone had them in their classrooms.
I’ve found that this often stems from a lack of understanding of numeracy development. Teachers might feel that a double-10 frame does the same job as a rekenrek when we’re working on conservation to 20.
 Conservation is the idea that quantity does not change based on how items are arranged, and this is foundational for students to develop number sense. We know we have 10 fingers and that we’re not going to grow any more, and we certainly hope we don’t lose any. We know that we always have five fingers on one hand and five on the other, so we will always have 10 fingers. But many students don’t trust that there are five fingers on their hand, or 10 total, and so they go back and recount.
 But, more than just knowing how many fingers are on a hand, students have to be able to recognize the quantity in more than one way, even if the student has a solid grasp on conservation to 5 or to 10. A lot of students end up memorizing the 10-frame or 20-frame (sometimes called a double 10-frame). But we really want students to understand looking at quantities in a different modality. If you think about a double 10-frame, it is usually stacked with five, five, five, and five, or you could also think of it as 10 and 10. When you’re looking at a rekenrek, you can look at it as five and five in a linear sense on one row, five and five on the bottom row, and then 10 and 10 to show 20. The Counting Buddy Sr. is another modality which provides a linear look at a quantity, with 10 and 10.
The key to a solid numeracy foundation is that students have a variety of ways to show conservation to 20 and they’re able to manipulate the quantity in multiple ways.
If you’re familiar with our numeracy talks, we often flash a rekenrek and ask students, How many did you see? How did you know? Sometimes, we flash the rekenrek and say, Take a picture with your brain camera, but this time, I’m going to ask you a secret question. The question will be an inquiry-based question like one of the following:
- What would be one less than what you saw?
- What would be one more than what you saw?
- What would be two less than what you saw?
- What would be two more than what you saw?
- How many beads did we not use?
Then we have students get hands-on with their rekenrek and actually build the number. We’ll repeat that same sequence of flashing the quantity on the rekenrek, having students show how many they saw, and then being asked any of those secret questions, but students now are replicating it on their rekenrek.
 If you’re not familiar with our Numeracy Talk Progression, check out the first on here! Members, you have access to all of the videos and all of our numeracy talks to implement in pre-K, young fives, Kindergarten, first and second grade (must be logged in to access)!
To make sure students really have a grasp of conservation to 20, we want to make sure they’re interacting with the quantity in multiple modalities with the utmost success until their second grade year. We obviously can progress to conservation to 40 (maybe in multiple 10-frames), or even conservation to 100 within an abacus as early as first grade, but we want to spend good time helping kids understand this very deeply.
As I was thinking about how to help teachers remember the rekenrek, since it is such a powerful tool to help students with this conservation to 20, I decided to make something that I would have liked as a teacher – a booklet. I (and probably you too) don’t have time to open a big textbook, find the activity I’m looking for, make copies, etc. I want things right at my fingertips, especially in the area of math. So, if you have a rekenrek in your classroom, whether you have a small group set, a demo set, or maybe you have an individual rekenrek for each child, this booklet will give you different activities that will ensure students have lots of great hands-on experience with this amazing tool.
 The rekenrek booklet includes 12 different activities to help students practice conservation to 20 so you really understand how to use the rekenrek as more than a shaker. It’s great for teachers OR parents to be able to help students see the structure of numeracy.
Sometimes the booklet isn’t enough. If you’re a visual learner, reading the booklet might not cut it. I get that. So I recorded a video on every single rekenrek activity that I created in the booklet. This video can be used to help you understand how the activity is done, it can be sent to parents so they can help their students at home, or you could even show it in your classroom to your students and let me “teach” the activity, pausing to have students build and interact with the rekenrek.
")
Basics of Using a Rekenrek
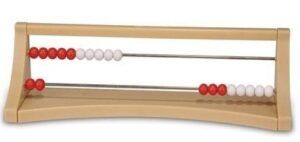
As we’ve mentioned, there are several different varieties of rekenrek floating around. Some classrooms have demo rekenreks. There are really nice mini rekenreks that I’ve been using with students a lot lately. I really like those because they’re not so clunky. We have a model that’s a bit bigger for kids to be able to manipulate. The moral of the story here is that there is not one right or wrong rekenrek to use. It’s the WAY that you use it that is really important.

We always want students to clear the rekenrek to the right. You could say “White Right” or “clear to the right, red in the lead” – whatever jingle works to help you remember to push all the beads to the right. We know a lot of our kids do not know their rights and lefts, especially in early childhood. So you’ll often see, on our rekenreks, that we take a Sharpie marker and we put a quick smiley face in the upper right-hand corner to help them remember.
Some teachers say that seems weird, because they feel like it should be cleared to the left, and then you push beads to the right, like we read. However, if you think about it, it does make sense. We push beads to the left to make a number, but the rekenrek is read from left to right. If I push six beads to the left, students will see a five group and one more.
Give students plenty of time to explore the rekenrek, especially if they’ve never seen it before! Dust it off and let them play with it! See what they comment on and ask inquiry-based questions to guide them in their discovery.
Don’t forget to use both rows to show numbers! You’ll see this throughout the activity book! After we clear to the right, we can show 12 by pushing 10 beads to the left on the top and two beads to the left on the bottom. But I can also show it by pushing six on the top and six on the bottom. The rekenrek is a master of helping students decompose numbers in different ways, and ultimately, understand our base-10 number system. The rekenrek will also grow with students. If students can show five in different ways, we can ramp it up to showing 20.
Rekenrek Activity Ideas
The rekenrek is such a versatile tool! There are so many different kinds of activities that it can be used for! We can do activities with missing addends, like “In the Tent” where we set up a camping scene for students with our rekenrek. Some of our “campers” are in the tent, some are by the fire, so students have to figure out the missing part. 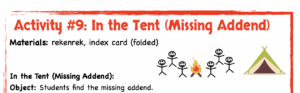
 Our friend Abracus loves the rekenrek! You can use it to show compensation using double or near-doubles. For example, have students show a double on the rekenrek with six on the top and six on the bottom , or a near-double with five on the top and six on the bottom. Abracus loves to zap the rekenrek so he can see 5 + 5 and then move the bead back to see that he has 10 plus one more equals 11.
 D.C. even uses the rekenrek to practice his strategy of decomposition and making 10s. If we had nine at the top and six on the bottom, D.C. can easily decompose that six into five and one, take the one, and add it to the 10. Then, we can easily see that nine plus six actually equals 10 plus five.
One of the fun games in our Rekenrek Activity Booklet is called Three Addends or Bust. Students work on adding three addends together on the rekenrek, showing how they’re solving, to see if they can be the person that gets 20 without going over.
Guess My Way is probably one of my favorite games for kids to play. I love it so much that I’m giving it to you today as a free download! Print it out, use it with the rekenrek, and once you see how much fun the rekenrek is to use, you’ll want to get the whole booklet and all 12 activities!

Playing Guess My Way with the Rekenrek
Imagine kids sitting at a carpet area with their own personal rekenrek in front of them (they could also be at their desks). Imagine yourself, the teacher, sitting in the rocking chair at the front of the class with your rekenrek. You’ve got a large book or a poster to hide your rekenrek, where you’ve built a number. You call out your number and say, Okay, who can “guess my way?” And the class goes silent, all you can hear are the clicking of rekenrek beads as students try to build the number the way you have built it on your rekenrek.
Let’s say my number is nine. I want to make sure I use both rows of the rekenrek to build my number and then hide it. The first kid raises their hand and says, I think I guessed your way! You have nine at the top and zero on the bottom. I look at my rekenrek and say No, that’s not my way. Now, we get to record this student’s guess in a number bond on the board to show how that student decomposed the number, and we move on to the next guess.
Don’t forget that we’re using the commutative property. My rekenrek might zero at the top and nine at the bottom, so make sure the students guess EXACTLY how you have your rekenrek. Don’t just give it away if the numbers are the same, they have to be in the right order too!
Another student raises their hand and says, I think I know how you have nine. I think you have five at the top and four at the bottom. I say, That’s not my way and go ahead and create that number bond for students to see that somebody guessed that way.
The next student might guess, I think that you have three on the top and six on the bottom. Maybe that is my way, so I then go ahead and reveal my rekenrek and say, You guessed my way. I have three at the top and six on the bottom.
Kids think they’re just playing a game here and having fun guessing the way, but realistically they’re showing different ways that they can decompose numbers!
I like for the student that guessed my way to now be the person that gets to sit in the hot seat and have friends try to guess their way. When I bring my friend up to the rocking chair, I select the number and then go behind them and help them hide the rekenrek. Then we go through the same process with me guiding the understanding of showing the different ways in the number bonds.
This is just one of 12 great activity cards that you can use at your fingertips, and don’t forget that it comes with tutorial videos that can help you (or even parents) understand exactly how to play the games.
 DIY Rekenrek!
If you don’t have a rekenrek at home, or aren’t able to send rekenreks home for parents to use with their students (because that can be kind of expensive), we have a whole blog post about how you can make your own rekenrek with mesh backing, black pipe cleaners and red and white beads. These are all pretty inexpensive materials, and I can make almost a whole class set for under $8!
Want to have a really fun Math Parent Night? Have materials available and everyone gets to make a rekenrek! Then, send them home with our booklet of activities! (Contact laura@sis4teachers.org to inquire about volume licensing for the booklet.)
I hope you enjoyed this blog and now have a better understanding of how to use a rekenrek as more than a toy where you can shake the beads back and forth. It’s such a wonderful math tool with so many ways to differentiate instruction and reinforce all kinds of concepts, plus, it’s just fun!