Fractions are coming up in most people’s math pacing!
 Whether you start your fractions unit in January, February or March, I know that most of our M³ schools will be focused on fractions in the near future. With that in mind, we want to dive into how we get these fraction tools in our Math Salad Bars and ready for student use.
Just joining us in this series? Read more about the importance of the Math Salad Bar on our blog or catch the first post in this series on getting organized about place value manipulatives.
 The dry erase labels that we have on the Math Salad Bar drawers are one of my favorite parts of the whole concept. While some materials might live on the Salad Bar indefinitely – such as counters, Counting Buddies for the younger grades, dice, etc. – most of the tools will rotate on and off the Salad Bar as they are needed. Those dry erase labels make it simple to have your Math Salad Bar support your current unit.
Our recent fraction blog post series is full of ideas for actually using the fraction tools in a variety of ways with a variety of math concepts. We also have one of my favorite games to play with fraction tiles – Cover/Uncover – available as a free download in our store! Today, we’ll focus on how to get those fraction tools organized so they’re ready to go when you are ready to start your fractions unit!
Fraction Tiles
If you’re making a first-time purchase of fraction tiles, I would recommend finding tiles that have percentages on the back. Mine have decimals on the back, and while it’s great to show the connection between decimals, fractions, and percentages, I would opt for just percentages for simplicity.
A word of caution: Fraction tiles are a great conceptual tool for 2nd and 3rd graders as they start to understand equivalent fractions. When students are first trying to wrap their brains around the concept of fractions, it is really important that they can visualize it. However, as students get into the upper grades, they tend to rely on the guess-and-check method of grabbing tiles and holding up them against each other to see what fits and find equivalent fractions instead of applying their understanding.
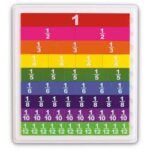
One more caveat about this tool is that the value, the fractional part, of the tiles is stamped on the tile itself. It makes the use of the tool very specific, and it would be very challenging if you wanted to change the amount considered a whole. For example, you might want to turn the ½ into a whole and ask students to find ½ of the new whole, but that would be difficult because the values are preconceived and labeled so clearly.
All that aside, there are lots of really great things to do with fraction tiles!
Fraction tiles are made of hard plastic, so they are LOUD, which is something to consider! They come with a tray, which you would think would be an added value for both storage and usage, but even if kids put the tiles in order on the tray before they put them away, inevitably, when they get picked up again from the Math Salad Bar, the tiles will be all over the place before the students get back to their seats.
 One of my favorite storage solutions for fraction tiles, which we talked about in the place value videos/blog, is photo containers. Since most people don’t print off pictures to put in boxes anymore, you can put fraction tiles in them! They fit perfectly into the 5×7 boxes that you can find at Michael’s, Hobby Lobby, Joann Fabrics, sometimes even at Costco. The boxes usually fit neatly into a carrying case with six in a row that is easily stored on top of the Math Salad Bar where students could select an individual box to remove and take to their seats.
As with the place value manipulatives, we want to make sure our fraction tiles are labelled as well. We always seem to have the misfit tool that someone finds, usually right in the middle of your reading lesson, which completely interrupts instruction. If you create a “Misfit Tool” box on top of your Math Salad Bar, those tools now have a place to go when they’re found on the floor so you can stay focused on instruction. Then, the student in charge of the Math Salad Bar that week can check the basket and return the misfit tools to their sets.
How Many Sets Do I Need?
Ideally in the classroom, I think 15 sets of fraction tiles is plenty. I base my recommendations on classes of 30 students, but I know classes all over the US have different amounts of students. With 30 students, if you had a guided math group of 10 and you needed each student to have their own individual set of fraction tiles, you’d have five sets leftover on the Math Salad Bar for kids who might be doing Math by Myself. If you were doing a whole class activity with fractions, kids could work in partners with a set of fraction tiles and split the responsibility for manipulating the tiles.
Labeling and Storing the Fraction Tiles
In this video, I’ll demonstrate how we set up the tools inside of the 5×7 photo boxes. Keep the labeling easy – you could make it a single dot, a small letter, anything that you want – I did letters on my set of tiles. This ensures that the one fraction tile you find on the floor later will return to the proper set.
Colored Papers/Area Model Papers
This is one of my favorite fraction tools to use with students as it really promotes the conceptual understanding that we’re after for our students. The tool doesn’t really have an exact mathematical term – some people call them area model papers, some call them colored paper sequence for fractions. The idea came from Mike Godfrey, a colleague who was a consultant for SDE, who showed this on a collaborative webinar we did together once.
These colored papers are a great next step after kids have had a lot of exposure to the fraction tiles because they don’t have the fractional parts actually written on them. In 5th grade, when we’re adding or subtracting with mixed numbers, kids could technically have two sets or you could easily change the size of the whole because they’re blank!
Making the Colored Papers

These colored papers are pretty simple, though they do take preparation. We start with five different colors. I prefer to use cardstock for durability, but you could use paper if that’s what you had. In the video, we’ll have red be the whole, orange be the half, blue would be fourths, and yellow that would be eighths, and green would be cut into sixteenths, but there’s no magic to the colors, just use whatever colors you have on hand and make sure you’re consistent across sets!
 If you choose to make these, you might have some of your more meticulous students help with that process, or in one of our M³ schools, we did a fractions workshop and then the Watchdogs (dads that come to the schools to help out) helped the teachers make the sets of these. Or, you can buy a class set of 15 pre-made area model papers in our store – already cut and laminated!
With all the work it takes to create these sets, but by the time you’re printing and cutting everything out, it would be worth the extra step to have them as laminated sets. It seems that unlaminated paper just invites student annotation (whether accidentally or on purpose), so laminating ensures that the tool has a longer life on your Math Salad Bar.
How Many Sets Do I Need?
If you really felt like you wanted to be more exploratory, you could give every student a set. However, as with the fraction tiles, you could have 15 sets for students to share. It’s really great for students to share a set because it promotes conversation and students are exposed to a different perspective of how someone else might conceptualize the ideas.
Labeling and Storing the Area Model Paper
Once you cut all the pieces, you can put them together in some kind of a clip. I know it seems redundant, but we like to label these as sets well because it’s inevitable that one ends up on the floor. Whether you write a letter in the bottom corner or use a dot pattern, make sure to label these sets so you can return the individual pieces to their homes.
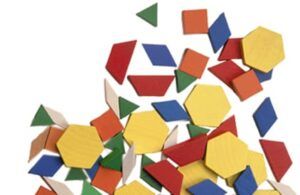
Pattern Blocks
Most people have a misconception that pattern blocks have limited use with fractions because, although the blocks aren’t labelled, they are pretty fixed. The hexagon is a whole and the rest of the blocks are designed to fit within that structure – the red trapezoid is ½, the rhombus is ⅓, and the triangles are ⅙. And so, it seems like you can only use those fractions.
However, these are great to have in your Math Salad Bar and there are so many things you can do with them! Read more about pattern blocks and check out this post on adding and subtracting fractions, this post on multiplication and division of fractions, or this one on fraction equivalence. I just love the pattern blocks!
I’ve seen some classrooms that, to save time, just leave the pattern blocks in the giant tubs they come in and then have students use their salad bowls to grab a scoop of pattern blocks to use at their table. However, tubs of pattern blocks usually come with thin wood-colored pieces that you can use to make a star and orange squares, and neither shape is helpful for fractions. So sorting the pattern blocks ahead of time is a necessary step to make sure you have blocks you need and the right number of blocks for kids to be able to do the various examples you set for them.
Sorting into Sets
My pattern block bags usually consist of:
- 3 hexagons
- 6 trapezoids
- 9 rhombuses
- 12 triangles
We want to have enough blocks to cover the whole – in this case three hexagons. We don’t usually have enough triangles to completely cover all three hexagons, but as long as you control the fractions in your examples I find that 12 green triangles is plenty. We don’t usually want to go all the way up to 18ths, as that can be a bit too big for the manipulatives.
With this collection of pattern blocks, you can do lots of different things. For mixed numbers, you could have two hexagons and a trapezoid to show 2 ½. You could also change the whole to be two hexagons and ask what shape would show ½ of the new whole – which would be one hexagon – and what shape would be ¼ of that whole – which would be the trapezoid.
I like the pattern blocks because it brings in fractions that are sometimes more tricky to represent with fraction tiles or area model paper, like the 9ths with the rhombuses
How Many Sets Do I Need?
I almost always have the kids partner up when they use pattern blocks so you would still need 15 sets for students to share, based on a class size of 30.
Labeling and Storing the Pattern Blocks
There are certain things I don’t like to do in a ziploc bag, but with pattern blocks, you’re just dumping them out and there’s a limited number of blocks that you’re working with so bags work just fine. The blocks also color-coded and chunky, so it’s easier for kids to grab the shapes.
It’s unnecessary to label the pattern blocks, but I do recommend having a tub of extra pattern blocks on your Math Salad Bar so that, if students find that their bag is missing blocks, they can just grab what they need to replace them.
________________________
Now you’re ready to face those fraction units head-on – armed with a fully stocked and organized Math Salad Bar full of manipulatives to help fractions make sense to your students!