I have all these place value discs – How am I supposed to use them across different areas of my mathematical instruction??
This is a question that we get from a lot of teachers and we know that having a Math Salad Bar full of tools but not knowing how to implement them can be frustrating.
Today, we’re going to take time to look at all the ways that you can use those place value discs in your classroom from 2nd through 5th grade.
Place Value Discs are Non-Proportional Manipulatives
 Let’s take a minute to get to know these great manipulatives. Place value discs are what we call non-proportional manipulatives. Proportional manipulatives are very common in our classrooms – take base-10 blocks for instance. We know that one cube is worth one, but 10 of those cubes together equals 10. If I put 100 of those cubes together, it equals 100. That is proportional – the size is relative to its value as you can see when you set 10 cubes next to a 10 stick. Now, let’s think about our coins in the United States. Our coins are non-proportional because our dime is small, but it’s worth 10 cents and our nickel in size is bigger, but it is only worth 5 cents. The size of the coin doesn’t proportionally represent its value.
 Place value discs come in different values – ones, tens, hundreds, thousands, or higher – but the actual size of the disc doesn’t change even though the values are different. We also have place value discs that represent decimal numbers – 0.1, 0.01, 0.001 and so on. As they become more familiar with place value, maybe even by using the place value strips, students can use non-proportional means like place value discs to help deepen their understanding of place value.
One of the most important things to remember when considering place value discs is that the brain is not ready for non-proportional manipulatives when it’s still developing the concept of proportional ideas. For example, in Kindergarten and in first grade, we don’t have any activities that use the non-proportional discs because, at that age developmentally, they’re learning to count and they’re learning to understand our number system. Kids need to be counting out cubes, putting 10 sticks together and bundling them into a group of 10, and then putting 10 bundles of 10 together to make 100. It isn’t until around second grade that the brain can start to process the idea of using a non-proportional manipulative to help students understand the concepts being taught.
I’m not saying that we don’t use proportional manipulatives in second grade and up, however. The research shows us that, with place value tools, we should lead students through using proportional manipulatives to non-proportional manipulatives. We want to use those base-10 blocks, but then progress to the non-proportional manipulatives, and then move to pencil and paper.

If you want to learn more about place value discs beyond this blog, we highly recommend Why Before How. This is one of my favorite books, written by Jana Hazecamp, and it lays out exactly how to use place value discs.
Let’s get started! We’ll tackle all the different ways that we can use place value discs to help students conceptually understand what we’re doing in math from grades 2-5.


Introducing Place Value Discs
Let’s start out with some basics! One of the easiest ways to start working with place value discs in your classroom is to help students just play with them and really understand how we can use them as a mathematical tool.
 We use place value discs along with our T-Pops Place Value Mat to help students see the ones, tens, and hundreds. The T-Pops Place Value Mat gives kids five chalkboard 10-frames and a whiteboard area. We always want students to fill the 10-frames full from left to right and this will help them quickly look and see the correct values. The 10-frames aren’t labeled because, with non-proportional manipulatives there would be no need to label the place value. In fact, it might actually be confusing. If we labeled the hundreds column, but then put in 200, it looks like we’re saying 200 hundreds, which isn’t what we mean. You can definitely write in the labels at the top until students get used to using the mat and know where each place value goes.
 Place value discs can be challenging to keep organized, so be sure to check out our Math Salad Bar video on setting up and organizing your place value discs so they can be student-ready when they’re needed. As students begin to use decimal discs in upper elementary, I like to have them keep their tenths, hundredths, and thousandths discs in a separate container from their whole number discs.
Whole Numbers
 To help students practice understanding the value of numbers, we can start by having students just build numbers with the discs – it’s that easy! Call out different numbers to your students, for example “I would like you to build 37”. As you can see in the picture, students are going to build three tens plus seven ones. You could also use the place value strips alongside the discs here so kids are really seeing what’s inside of the value of 30, that it’s actually worth three tens. From there, you might have students write the number in numerical form after they’ve illustrated the value with discs.
 Another, higher level, example would be to ask students to build 147. They’ll use one orange hundreds disc, plus four red tens discs and then seven white ones discs. This time, instead of building the number with the place value strips, students could actually write it in numerical form.
Students also need to practice representing the value of numbers they see in word form with their discs, and then writing it in numerical form or building the value with the place value disks. For example, if you write out the words five thousand one hundred two, students often struggle reading words, or maybe even speaking them clearly as to what the values are. When kids see five thousand one hundred, they have trouble realizing that there are actually zero tens. So it is really valuable to have students build this number with five yellow thousands discs, one hundreds disc and then two ones discs. Then, they can either create the number with place value strips, or write it in numerical form.
 Next, you can go the other way and have students represent the value of a number given in numerical form with the discs and translate it into word form. You can show the number 5,102 in place value strips, have students create it with place value discs, and then write it in word form.
 Differentiation can easily take place based on the skills of the students if you vary the place values that you’re using. I like to challenge students by having them work with numbers that include zeros in one or more places. For example, if you gave them the number 5,002, would students really understand that they just need five yellow thousands discs and two white ones discs? I think giving students examples, as they’re starting to understand the ideas of expanded form, is a great way to start to play with place value discs and really see what’s happening with the value of numbers.
Decimals
 When you’re working with older students, it’s just as important that they have time to play with the place value discs to build their decimals and develop a familiarity with them. This provides opportunity for students to develop an understanding with the place value mat, looking the relationships between quantities, for example how it changes when we multiply by 10 (moving to the left on the place value chart) or divide by 10 (moving to the right on the place value chart), or how 10 tenths equals one whole, etc.
For example, you can ask students to build three and seven tenths (written 3.7). One student can build it with place value discs, while another can build it with place value strips. They would use three white ones discs, and seven brown hundredths discs. By saying the number out loud and not necessarily writing it down for students to see in numerical form yet, they can start to understand how to say decimal numbers.
 Then, let’s build one and 46 hundredths (1.46). On their place value mats, students will use one white ones disc, four brown tenths discs and six green hundredths discs. Ask students to write it in numerical form to see if they understand that this would be 1.46.
 We can also do this in fifth grade with students discovering numbers into the thousandths. Have students build five and one hundred two thousandths (5.102). Many kids will not really see that decimal part as one tenth and two thousandths until they build it.

Try asking for five and two thousandths. Can students understand that it will be five ones discs and two mustard-yellow hundredths discs?
It’s important here for students to see a decimal number in word form, then build it, then write it in numerical form. Of course, you could also go the other way and show students the numerical form, have them build it and see if they can come up with the word form. I find it so interesting to see what kids can do here! We don’t usually write checks anymore, so the idea of writing out numbers is pretty foreign! Allowing students time to play with the discs will help them grasp the concept of the different forms of a decimal.
Once students are familiar with the value of numbers and can easily recognize and build the different forms of a number, we can move into solving different kinds of problems with the place value discs. We’ll begin by modeling with whole numbers, and then with decimals, though the problem solving processes are the same for both types of numbers.
I firmly believe the best way to approach these activities is to encourage inquiry among students instead of correcting them, telling them how many to build and how we want them to do it. Whether students are working alone, with a partner, or even in a collaborative group, we want to encourage self-discovery!
Addition
The first thing that probably comes to mind is the traditional method of addition, but we don’t want to dive straight into that. We usually first look at D.C. for decomposing and composing to make a friendly number, then Abracus to show compensation, and Value Pak for Partial Sums. Once we are ready for the traditional method this will be one of the first ways we use place value discs in second grade. Of course, this is part of T-Pops’ favorite strategy, known as the traditional method or standard algorithm. He’s the oldest citizen in Mathville and loves to do that traditional method! Using place value discs when teaching the traditional method helps keep students’ focus on attending to place value instead of memorizing “shortcuts” like “carry the one”. In fact, the one that they’re “carrying” might not even have a value of one, it’s likely going to be 10 or even 100!
-

- DC
-

- Abracus
-
- Value Pak
-

- T-Pops
This is a great opportunity to use the place value discs on the T-Pops Place Value Mat to build a number and see how it’s changing when you add 10 or 100 or .1 or .01. We do this with our place value strips as well, of course, but I really like combining both the discs and the strips to help deepen understanding.
Whole Numbers
 Early on, we want kids to look at a 2-digit number and be able to tell us what 10 more than that number would be. Let’s start with the number 68. Ask students to build 68 on their place value mat with the discs. You also want them to build it with place value strips, or you could have students work in pairs where one is using discs and one is using strips. Then ask: What would 10 more be? As the students add one more tens disc to their mat, they can also change the strips from 68 to 78 to show how the number changes.
 Experiment with 3-digit numbers and have students add 100 more. It might sound simple, but students often struggle with this concept! Have students build the number 234 in both discs and strips. Add 100 more by adding one orange hundreds disc to the mat, and simultaneously, change the value of the number with the place value strips.
 Before we get into the traditional method, it’s really important to have students add 10 more to a number like 398, where they are going to be required to flip into the next place value with a regroup. It can be a challenge to wrap your mind around, but slowing it down and acting it out can really help students see what they’re doing. Have students work in pairs and one builds 398 with the place value strips, and the other builds it with discs. They can each add 10 more, but when you go to read the number, you can say “3-10-8”, which is what I’ve seen many students do. This allows students to physically see how to regroup. When they add 10 more, the nine tens becomes 10 tens, which turns into 100. Adding that 100 to three hundreds, it becomes four hundreds, leaving nothing in the tens place. So, now we can read the number as 408. Letting students play around with this regrouping/renaming process and get comfortable with it BEFORE they learn the traditional method of addition is really important.
Traditional Addition
 For the traditional method, start with problems that don’t require regrouping so students can get used to using the manipulatives. This will help the inquiry-based questioning as we students realize on their own they need to regroup.
Let’s start with 64 + 25. In a traditional addition problem, we’ll start by building the first addend on the mat. Typically, we build the second addend below, off the 10-frame grid, so students can see it as a separate number. If there are too many discs to fit in that space, I usually have kids stack their discs like coins. Then, write the algorithm on the side of the mat.
Begin by adding the ones. Take the five ones from the second addend and add them into the four ones already in the column. Write the total number – nine ones – in the ones place in the algorithm.
Then add the tens. Take the two tens and add them to the six tens already in the column. Finish by writing the total of eight tens on the algorithm so we can see the answer is 89.
That’s easy enough! But, let’s try a problem that needs a regroup.
 Write 137 + 85 in the workspace. Students can build 137 on the mat, with one orange hundreds disc, three red tens, and seven white ones, and build put eight tens in a stack below the tens column and then five ones in a stack below the ones column to represent the second addend.
Then, we start to combine the two sets of discs. As the kids add their five ones to the seven ones already in the 10-frame, they’ll see that they won’t all fit. They’ll have a full 10-frame with two leftover. This is when we get to rename, or regroup. We DO NOT want to say “carry” because we’re not actually carrying anything. We’re taking the 12 ones and renaming it into one ten and two ones. Kids can cash those 10 ones in for one tens disc and put it in the tens column.
Originally, we had three tens, and with one more, we have four tens. Then we add the other eight. Again, kids will fill in those spaces and see that their 10-frame is full and they have 12 tens, which is another name for one hundred and two tens. Again, they’ll regroup, trading the 10 tens for hundred that they can put in the hundreds column and get their answer.
This is the best way to help kids actually see what’s going on when you use the traditional method to add. Another thing you can to do solidify this concept even more is to have students use the whiteboard space on the mat to keep track of any changes they’re making while they manipulate the discs.
Top or bottom regroup? That’s up to you. A bottom regroup, as we have pictured in our Math Mights Poster, helps kids to see that one ten and two ones does equal 12 if you look at it below the algorithm. There’s nothing wrong with a top regroup, but be careful to avoid the “carry the one” phrase that is often used with that method. It’s also a little easier to forget about the value of numbers when they’re adding together at the top, so having them at the bottom might help kids see things a little more clearly.
Decimals
We can also play with the idea of adding more to a place value in a decimal number. Students already find the idea of a number smaller than one slightly confusing, so we need to give them a chance to develop familiarity with this concept. As we do with whole numbers, we use place value strips alongside the discs so kids can really visualize what’s happening.
 Our first example is asking students to build six and four tenths (6.4). What is one tenth more? By adding one brown tenth disc, and reflecting the change in the place value strips, we can see that it is six and five tenths (6.5).
 Let’s look at two and 34 hundredths (2.34). We can ask students to show one hundredth more than what they see. They can add the hundredths disc to see that it would be two and 35 hundredths (2.35). But we also want to make sure they know how to say the number and that they’re going about it the right way. Many students will really benefit from acting out the process of adding one tenth more or even one hundredth more, you could even have them show one whole more.
 We also want to help students see what happens when adding more flips to a different place value. If we had three and 98 hundredths (3.98), and added one more tenth, what would happen? This example will reinforce that ten tenths is going to move us to the left of the place value chart. We’re going to take that ten tenths and change it into one ones disc, which leaves the tenths place empty. Students have to understand that the zero in the tenths place doesn’t mean “nothing”, but that it’s actually a placeholder for the tenths. We add the newly-changed whole to the ones, giving us a final value of four and eight hundredths (4.08).
This can be pretty complex. Give fifth graders lots of different examples where they’re having to go and make a new number by changing all the different parts of the place value. Too often, I think we want to start having students get into rounding, but they really need to see how to interact and increase numbers that are less than one.
Traditional addition with decimals using place value discs is simple. It uses the same ideas that we use with whole numbers, but in this case, students will be using the whole number discs and their decimal discs. Usually, I like students to keep their decimal and whole number discs separate, but if you wanted students to have a combined kit and you want to streamline, you could probably get rid of your thousandths discs, and if you aren’t adding within the 1000s, then could also get rid of those discs as well.
Just as we did with the whole numbers, we want students to begin practicing adding with decimals without a regroup. A lot of students struggle understanding the traditional method when it comes to decimals because they don’t understand that 10 tenths equals one whole, or 10 hundredths equals one tenth. When they see 10 tenths, for example, students often think that that means one hundredth, which makes sense to them if you think about adding 10, 20, 30, 40, 50, 60, 70, 80, 90, 100. But we want them to see, using the T-Pops Place Value Mat, that when you have that total of 10 tenths, we move to the other direction on the place value board.

Our first example shows six and four tenths (6.4) plus two and five tenths (2.5). We’re going to build the first addend on the mat, and the second addend down below. We can begin by combining the five tenths with the four tenths. Every time we make a move with the discs, we have to be sure to record that on the dry erase work area. We can see that, altogether, we have nine tenths. Moving to the ones, students can combine their ones discs, two and six, to see that they have their final answer, eight and nine tenths (8.9).
 As students move on to start regrouping, it’s really important to go slow and make sure students are attending to place value! In our second example, we have one and 37 hundredths (1.37) plus eighty-five hundredths (.85). Students will build the first addend with a white ones disc, three brown tenths discs, and seven green hundredths discs, and then underneath, stacked like coins, they can put their eight tenths and five hundredths.
As we begin to add, we have seven hundredths plus five hundredths, which gives us technically a total of 12 hundredths. Another name for 12 hundredths is one tenth and two hundredths. As students make that regrouping, you want them to make note of what’s happening on the dry erase board. Students can choose a bottom or top regroup, either works well.
Next, students will take the three tenths, plus the eight tenths, plus that additional tenth that they brought over. So eight tenths plus three tenths gives them 11 tenths, plus one more gives us now 12 tenths. Again, we want to talk about the idea of renaming, not carrying, because we’re not really carrying it anywhere. We know that 12 tenths equals one and two tenths. Then students can take their ones and add those together to get the two. They can see their final answer, not only in the place value discs, but also in the traditional algorithm as they’re writing it on the place value mat.
All of our examples with place value discs, can also be drawn in a pictorial representation. You would want students to make the grid similar to how it looks on the T-Pops Place Value Mat and have students show you how they’re regrouping and changing, for example, 10 hundredths into one tenth or 10 tenths into one whole. It’s a really great way for kids to prove that they understand the traditional method by attending to place value with decimals.
Subtraction
Whole Numbers
As we begin subtraction, we typically think we should just start doing the traditional method. But often, students need a bit more time to just understand the idea of what “less” means, especially as we start working with larger problems, where values are changing within place value.
 Let’s start with the same number we used in addition – 68. What would be 10 less? Students can build the number with place value discs, simultaneously acting it out with place value strips as well. They’ll put in six red tens discs and eight white ones discs. Then, as they physically take one of the red tens discs away, they will also make the change in their place value strips.
 We can also build a higher number, 234, and ask students to show 100 less. Sometimes, we take this for granted, and it seems like a simple concept, but students often have a lot of weakness in the area of place value. They’ve usually memorized a process, but have a hard time seeing exactly what we’re doing or asking. Showing the change in value in a conceptual way will help the concept click so much faster.
 A really high challenge problem would be to ask students to build 408, with four hundreds discs and two ones discs, then ask them to show 10 less. Then sit back and let them think! Some students might want to count back 10 and just tell you the answer, but you want them to SHOW you! What needs to happen here? Students will look at the tens column and see they don’t have any tens to take away, so what equals 10 tens? 100 does! This is the early stages of regrouping, but it’s so much less daunting than showing them in a big algorithm that they have to figure out. They can easily see to take that one hundreds discs, move it off the mat to leave three hundreds discs. Then, add 10 tens discs into the empty tens column and then, they can do 10 less by taking away a tens disc. Easily, they’ll see the answer is 398. Be sure to spend plenty of time with this idea of subtraction with 10 less or 100 less and flipping over into other place values. This will build a foundation for students to learn regrouping when we do traditional subtraction.
Traditional Method
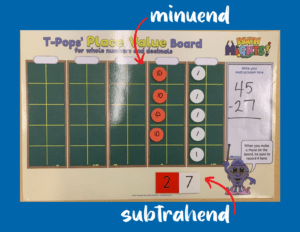
Good ol’ T-Pops shows up to use place value strips with subtraction in second grade, though Value Pak still likes to peek in! We have several different videos showing this concept. We start by building the minuend, which is the first number in subtraction, with the discs and we build the subtrahend with the place value strips so students can really see what it is they’re subtracting.
 Let’s take 45 – 27. We build 45 in discs on the top of the T-Pops Place Value Mat and 27 in place value strips at the bottom. Can we take seven away from five? We have kids actually put the five ones discs on top of the seven ones strip to really see if they can take it away, which they can’t. We like kids to leave those discs on top of their seven strip so that they can look at the process of regrouping. We go over and grab a tens disc and change the number from 45 to three tens and 15 ones, so they really get a good visual and understand that traditional process. Now, we pick up that seven and, knowing we already have five discs, we take two additional discs from the ones place and we can subtract. Then, we can do the same with the tens discs.
I think it’s really valuable, when we’re teaching T-Pops and regrouping, that kids are really using those place value strips to help them really understand exactly what we’re doing with them. This video tutorial will really help you see how you might go about applying that concept!
As students begin to use higher numbers, through 1000, they’ll use the same process. We have a really great video clip of this in action during a teacher training the other day! Using both the discs and the strips is so helpful to get kids to really see what they’re taking away and how they’re renaming and regrouping numbers.
Subtraction T-Pops style! Build the Minuend with Discs & the Subtrahend with Strips! 🌟 #mathmights pic.twitter.com/b5mM5C3vFD
— SIS4Teachers (@SIS4Teachers) October 6, 2021
Decimals
 When we begin subtraction with decimals, we want to help students build on the idea of adding more by helping them understand “adding less”. Have students build six and eight tenths (6.8) with their place value discs. Simultaneously, have them be building with their place value strips. Ask students to find one tenth less than what we just built. They will take away one of the tenths discs from the tenths column to make it seven tenths, and the six stays the same, leaving the total as six and seven tenths (6.7). Of course, they should also reflect the change with the place value strips.
 If we had two and 34 hundredths (2.34), we could ask students to take away one hundredth and see if they can determine the answer to be two and 33 hundredths (2.33). We don’t want students to say “two point three three”, we want them to really be able to use the place value and say the numbers properly to reflect that place value.
 A really tricky problem would be one tenth less than four and two hundredths (4.02). I love having students working as partners to build with both discs and strips, especially for this kind of problem. Let this be an inquiry-based exercise – pose the problem and leave it there. Don’t say anything! What do you think they’ll do? I find it fascinating to watch and discover where the number sense lies with our upper elementary students. Will they take one hundredth and change it for 10 tenths? Will they realize that one of the ones discs in the four is actually worth 10 tenths? We want kids to look at going the other way on the place value chart to see if they can figure out how to change four and two hundredths into three and 92 hundredths by taking away one tenth.
This is such valuable work, no pun intended! I think students do not get enough hands-on experience to really fluidly understand what they’re learning with decimals before they’re pushed into the traditional method of subtraction.
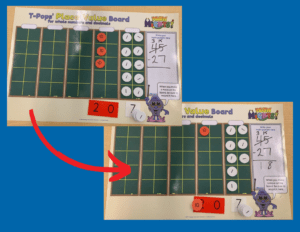
Subtraction with the traditional method using the place value discs is the same process we follow when using the place value strips. Whether we’re using whole numbers or decimals, we build the minuend, the first number in subtraction, with the discs. The subtrahend, the second number, we build with place value strips. Don’t forget to check out the video in our video library – the Math Might Subtraction Showdown (scroll down for the decimal video)!
 We start by building the minuend with the discs and the subtrahend with the strips so kids can see how we’re taking the 4.2 away from the 8.1. When we do this process on the place value mat, we can see there is 3.8 left. I think it is important that students come to a good understanding of the traditional method with the manipulatives and then, as they’re ready, move to quick draws with place value discs and strips and show how they’re doing subtraction traditionally.
Multiplication
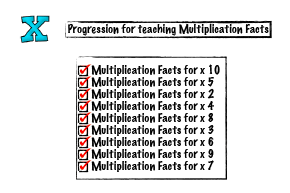 As we look at the concept of multiplication, it’s really important to understand the patterns of multiplication and all the pieces that would come before what we’re showing here. Check out our blog on the progression of multiplication, and how we help students learn different patterns by teaching tens and 5s, and then 2s, 4s, 8s, and then 3s, 6s, 9s, and finally 7s. Play games like Multiplication Speed and Multiplication Bump. Watch the videos on our fact flap cards and number bond cards for multiplication and division. All of these things would come first.
 Additionally, as you help students begin to explore multiplication, you’ll want to check out our Multiplication Progression video series, where we begin with the idea of decomposing. In the videos, we look at students kinesthetically using their bodies to show “groups of.” If we want to show three groups of four, students have to move their bodies and physically get into three groups of four so they can see the total.
It is essential that we do a lot of this kind of work before we move into using the place value discs. If kids start to understand the patterns of multiplication, understand how they can decompose to solve, and then are seeing how to do that kinesthetically, place value discs are a perfect next step.
Whole Numbers
 A simple beginner problem for students to solve is 4 x 12, or four groups of 12.
If you need to take it lower than teen numbers, you could certainly use one-inch square tiles or counters to help students see how they can put things in groups. I certainly could never do this with a proportional tool like base-10 blocks because it would be too clunky and messy for students.
If we ask students to show four groups of 12, and they’re already understanding how to do that kinesthetically, we want to see how they translate that understanding. We want them to create four circles, because we know that’s how many groups we need. In each group, we’ll put 12, so one red 10s disc and two white ones discs. To get the answer, we add all the groups together to get the total.
As you increase the complexity of the examples, you do have to be careful as students only have 15-20 of each value in their kits. Make sure you think through each example problem you give ahead of time so your students have enough discs to build it. But don’t let that keep you from increasing the complexity of this activity! Try a problem that doesn’t work out perfectly in an inquiry-based way where you don’t supply all the answers. Have students deep dive into a problem to see if they can figure it out.
How you write the problem out will also help students think differently. We usually start with problems written horizontally, but we can start stacking it in a traditional algorithm, which is great as students are starting to learn the idea of partial products and acting out this process.
Additionally, as you start working with larger groups, a circle might not be the best fit to display your groups. You could use place value to show the groups in a linear way (see picture).
 For example, let’s take four groups of 23. We can see that we have four groups and in each group, we see 23. When we go to find the total of that, we’re going to realize if we have four groups of three, we end up with 12, which we need to regroup or rename.
A lot of students just say, “Three times four is 12, so carry the one.” But when they’re using the place value discs, they realize that it’s not a one! It’s actually a 10. The way I have this laid out in the problem, it lends itself to the idea of partial products, where I have this +10 that you’ll see in the discs in the picture at the top. It’s not +1.
Then we look at those tens. It’s 4 groups of 20, and so you can see one group, two groups, three groups, four groups of 20, plus that additional 10. Instead of thinking of it as “4 x 2 = 8, + 1 = 9” the discs are going to force students to use the place value.
You obviously can do this with other problems. Try six groups of 23, making sure to consider how many discs you have and how many students are working together. Try four groups of 126, which might be an opportunity for two students to join together to practice this idea.
After students have explored with the conceptual tool, it’s great to have them draw a picture where they can show those groups and show their regrouping. This gives you a way to see their understanding of place value and the idea of “groups of”. I wouldn’t have students do this with more than five or six groups, as you don’t want it to become ridiculously cumbersome for students to draw. But we also want to make sure that students understand how we’re showing those groups and what’s really happening in the area of multiplication.
Decimals
 Let’s look at the “groups of” concept for decimals. Ask students to build 4 groups of one and two tenths (1.2). We want students to draw the four circles like you see pictured, and physically put one white ones disc into each of the groups, and then two brown tenths discs into each of those groups, and then be able to add it all together to see what the answer is.
 As we increase the complexity, we have four groups of two and three tenths (2.3). You can show this in the traditional way as well, but we want students to see that, as we get 12 tenths, another name for that is one and two tenths. In this case you are bringing over the one, but kids can physically see that whole number, count the total of the discs that they have to see that they have nine and two tenths (9.2).
Division
When we look at division, it’s important for students to really understand what division means first. We want kids to have lots of experiences with and opportunities to understand “groups of” and then trying to figure out how many groups of four are there in 12? Or if I had 12, and I wanted to divide it into four equal groups, how many would be in each?
 As with multiplication, we need to help students understand the patterns of division, which they can do as they learn the patterns of multiplication. Our fact flap cards are a really great tool for this! On one side, we have multiplication facts and on the opposite side, we have division facts. Our number bond cards are another great tool to reinforce the ideas of division. We also have Division Bump! for kids to play, as well as lots of other games which can immerse them in what division looks like.
 Additionally, check out our video on kinesthetic ways of developing division. All of these activities and resources provide opportunities for students to really develop a foundation of understanding for division.
Again, just like we do with multiplication, students can use counters or one-inch square tiles to physically see how division works with smaller quantities before you jump into using place value discs. Trying to do division with base-10 blocks in a proportional way just doesn’t have the power that we’ll see when using non-proportional manipulatives like place value discs.
Even as adults, let’s be honest, division can still be confusing because we probably still haven’t really slowed down the process of division to understand the why behind it. I think even you, as a teacher, might find a few “aha!” moments as we’re talking about the process of division that we can teach students.
Whole Numbers
 The first way I look at division is when the groups are always going to be equal.
Let’s take 48 ÷ 4. First, students are going to build the dividend, which is 48, and then kids will know the divisor is four, which is how many groups we’re going to create. After setting up the problem, let the students make groups. Many of our students struggle with the idea of equal groups. They’ll put that 48 into groups, but they sure won’t be equal. So, while this seems like a simple problem, understanding fair shares and equal groups is important for a student’s understanding of what division really means.
Have students take those 48 discs and physically separate them into groups. They could draw circles for groups, or use bowls. Students could also create linear groups of rows or use the T-Pops Place Value Mat where each 10-frame is a group. How they do it is up to you, but the important part is that they see the discs physically separated into different groups.
Once the discs are separated into groups, we have to think about what the problem wants to know. We already have the total, since we started off with that, but we need to know the quotient, which is how many are in each group. Students should be able to visually see there are 12 are in each group, so the answer is 12.
 If you want to take division to another level and really understand what happens in the traditional method of division, check out our Division Progression series, the Show All Totals step. This explanation will take the process I show in that video to a much higher conceptual level for students who might not understand the process.
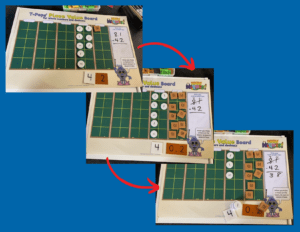
Let’s take 134 ÷ 3. We can write it in the standard algorithm and build it with one orange hundreds disc, three red tens discs and four white ones discs. When we look at this, students will say “three doesn’t go into one.” When we build it, however, they can see that the value of the one is actually 100. But what we want them to see here is that I can’t take that 100 the way it is and divide it into equal groups. We have to think about it differently, we have to regroup it. Students might say, “Well, three doesn’t go into one, so let’s try 13.” But we have to help them see the value of that 13.
 I love using the place value discs here because they are always showing the value. That’s why we call it place value understanding, right?? In the pictures, you can see how we underline the 13 and draw an arrow so students can see that 13 actually equals 130 because we technically have 13 tens.
Now students need to look at those circles and figure out how they can get those thirteen tens and divide them up. Obviously we’re wanting equal groups, so there are only enough for four in each group.
We put that four up there at the top of the algorithm because students will say, “Three goes into 13 four times.” But that’s not actually the case. Three goes into 130 40 times, so we have an arrow where we can point students to see that the value in each of the groups is really 40. Then, we multiply 40 x 3 and we know that, showing all totals, is 120.
Most of the time, in traditional division, students are taught to just sling an arrow down and bring down that four, even though they have no idea what the value is. By showing all the totals, students can then subtract 120 from 134, and are left with 14, which kids can physically see as they look at the discs.
But now, we’re in trouble. Fourteen doesn’t really divide evenly into 3. So, we have to take the tens discs and cash it in for 10 ones, which gives us 14 ones to start dividing. We can start putting discs in groups and see that we can put four in each. 4 x 3 = 12. So, again, we subtract 12 from 14 and we’re left with the remainder, which will also be left with the discs.
This is such a powerful way to help students actually understand division. They can see it, they can manipulate the discs and then learn to visualize the idea as well.
Decimals
Once students understand how a division problem really works, they will have a much deeper understanding when you transfer the process to using decimal numbers. The process is the same, but students will have an easier time following the transition if they understand whole numbers first.
 Let’s take four and eight tenths divided by 4 (4.8 ÷ 4). We don’t want to start to complex with decimals. We just want students to understand the ideas of equal groups. So, we know that we need four groups, and we can see the discs very easily separate into those four groups, even though they’re not whole numbers. Right away, students should be able to see that we have one and two tenths (1.2) in each group
Let’s try a bit more complicated decimal problem – 41 and six tenths divided by four (41.6 ÷ 4). We’ll use the same process, and start by building the problem with four red tens discs, one white ones disc, and six brown tenths discs. Then, we have to think about what to do if we need four equal groups. The beginning of this problem is fairly simple, we just put one of those four tens into each group. However, we want to make sure kids don’t just ask, “How many times does four go into four?” We need them to see that they’re really asking how many times four goes into 40, and the answer is 10. When you look at each group, you see the tens disc.
If we’re doing the Show All Totals method, which I prefer as kids are starting out with division, they’re going to write what they’ve put into each group, the 40, and then subtract to see that we have 1.6 left.
 Again, we need students to focus on the value. We have the one in the ones place, which we can’t really break into four groups, so we put a zero at the top of the algorithm to show that we can’t divide that place. So we’re left with one and six tenths (1.6). How many times does four go into 1.6? It doesn’t, it’s too small. So, we have to regroup. Students can trade in the one for 10 tenths, and now they’re looking at 16 tenths, which easily divides into four groups.
In the end, when we subtract it out, we realize that we have 10 and four tenths (10.4) in each of the groups. In this case there is not a remainder.
Hopefully these pictures will help you understand the concept of Show All Totals and really understand the concept of division much more conceptually, so you can then share it with your students!
Like with every activity, you can always go back and try doing this with drawing, having students show the same concept as if they’re using the discs but showing it in a pictorial way to demonstrate their understanding. Then, they might even go more into a procedural understanding for the concept of division.