Ever wish your manipulatives would organize themselves?? You’re not alone!
Manipulatives are great to have in the classroom, especially for place value. When we think about setting up those manipulatives, however, most of us wish we had a fairy wand to wave and our Math Salad Bar would be student ready in an instant!
 In most of our M³ (Molding Math Mindsets) project schools, we give our teachers either problem solving or numeracy math toolkits that are customized for each grade level as part of their training. It is really exciting to leave a training where you not only get great information, but also a bag full of stuff to take back to your classroom! It’s almost like Christmas or your birthday! But when you do get back to your classroom, reality sets in and you might start thinking…I have all this stuff, but how do I set it all up??
Place value discs and strips are two great manipulatives that are included in our math toolkit, but they are “some assembly required.” By investing a little bit of time in setting up the tools properly on the front end, you can avoid the two most common issues teachers often have with manipulatives: wasted time and “misfit” tools. We want the manipulatives to be kid-ready so students can walk right up to the Math Salad Bar, get the tools they need and get to work without having to spend time trying to find all the pieces they need or counting to make sure they have a full set. And, by spending time labeling and organizing up front, if a piece goes missing or drops out of a container it can easily be returned to its proper place because we know exactly where it came from.

We recommend having a basket for these “misfit” tools – a fraction tile, a deck o dot card, a place value disc, or even a counter – that always seem to turn up on the floor, no matter how careful students are. Checking the basket is a part of the responsibility of the student in charge of the Math Salad Bar that week, and they can quickly return the manipulatives to their proper place in the corresponding bin or drawer.
Not familiar with a Math Salad Bar? Every M³ classroom has one! It’s a set of drawers – 10 on one side, five on the other – with dry erase labels on each to indicate the contents (which can be changed to support each unit) and salad bowls on top for students to transport the manipulatives to their tables. Read more here!
We’ve found that, if the tools aren’t set up and ready to use, they won’t get used, so this month, we’re going to do some housekeeping to make sure all our tools are student ready! This is one of the topics that we get asked about frequently, so we wanted to make some tutorial videos that you could refer to throughout the year as you change out the tools in your Salad Bar to support the unit of study.
This week, we’re focusing on place value discs and strips and how they can support non-proportional tools in teaching.
Most of us had base ten blocks for place value because the research shows that we should start with the proportional manipulatives – base 10 blocks, unifix cubes, etc. – and then in second grade, we transition to more non-proportional manipulatives, like U.S. coins, where the dime is smaller but worth more than the larger nickel.
Place value discs are non-proportional manipulatives that represent whole numbers as well as decimals. They provide an opportunity for kids to manipulate numbers, engage in discussion and problem solve through place value problems with standard algorithms in addition, subtraction, multiplication, division. Place value discs also help with rounding, estimating, adding more or less, place value basics – the list goes on.
Jana Hazekamp’s book, Why Before How, is a great resource for this idea of non-proportional manipulatives and will remind you about the various place value tools you could work with as you teach various concepts. One of our project schools will actually be doing a book study on this next semester!
Place Value Discs
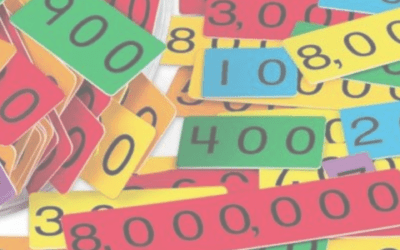
 Our place value discs come in a bag of about 100 of four values. They’re in new packaging and come in 1s, 10s, 100s, and 1000s. They also go up through 1,000,000, though you don’t necessarily need a class set of 10,000 and 100,000. Many times, by the time they are ready to work with larger quantities, students are already familiar with the manipulation of the discs and the idea of place value, so they don’t need them.
The sets come with 100 with 25 of each value, so a class set would require approximately 14 bags to use for 30 students.
You could certainly download our free paper version of the place value discs if you wanted a few for examples, like if you were multiplying by 10 or 100 and showing how a number would get larger. I just find it very cumbersome to have discs all the way to a million where often the pictorial representation is sufficient for students at that point.
I definitely prefer and recommend purchasing the discs vs printing off copies. Once you print (in color!), laminate, cut everything out, and then code and organize, it’s just not sustainable over time! Remember, we’re trying to SAVE time!
Getting Started with Discs
Pro Tip: Recruit one of your own kids or a few trusted students in your classroom to help set up some of the discs with you!
Start the process by sorting the discs by color – 1s (white), 10s (red), 100s (orange), and 1000s (yellow). Then separate them into sets.
How Many Sets Do I Need?

I like to put 15 of every value in a set to make them kid-ready. You could include up to 20 in a set if you had a lower class size or had more discs, but our rule of thumb is that, if you have 30 kids in a class, you want 15 sets so they can be used in pairs. When students use the sets for activities, they could divide up the responsibilities in place value – one in charge of the 10s and 1s and the other would manipulate the 100s and 1000s.
Some teachers have an individual set for every single student, but that might only be necessary if you are working with a guided math group. In that case, 15 sets should still be enough! With 30 students in a class, divided into three groups of 10, if you were working with a group of 10 students that each had their own set, there would still be 5 sets left on the Math Salad Bar for students to use while working independently.
Coding the Sets
Once they are separated, you want to be able to code the discs in some way. This is probably the part that takes the most time, but will be completely worth it later on. You might use a letter or a dot series (think dice patterns) or even different colors. Be careful with colors though, as the discs are colored and you don’t want your marking to get lost, especially on the red disk! Once you decide what to use, grab a marker and fly through the sets, marking each discs with a symbol of some kind.
Storage
 You have a few options for storing these newly-marked sets of discs. Since my manipulatives travel with me, I love these mesh bags from Boxcars and One-Eyed Jacks. In the classroom, though, I want manipulatives to be easily opened and used, so I recommend 4×6 photo boxes. They are easy to open and serve as a little tray for the discs so students can easily get the discs out to use. There are lots of great sales on these – you can get them at Michael’s, Hobby Lobby, Amazon – and in some places, you can even use a teacher discount!
Side note: These boxes also come in 5×7, which I like to use for fraction tiles.
The 4×6 boxes fit 15 of each value very nicely, and also have enough room to store place value strips inside as well. Once the boxes are loaded, mark the box with the same letter or symbol that you used on the back of that set of discs. So, the A discs go in the A box, etc. Some of the sets of boxes come with a carrier, which is nice because you can easily take it off the Math Salad Bar and lay it out for kids to use maybe by your carpet area.
Getting Started with Place Value Strips
Pro Tip: You might be tempted to immediately begin detaching the perforated place value strips, but DO NOT separate them yet! You’ll see why in a moment!
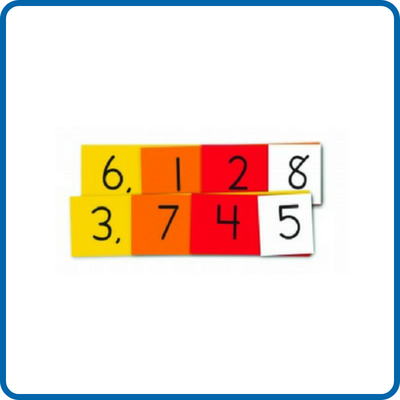
Different math programs call place value strips by different names, but in our math toolkits, we include 30 sets of place value strips for a classroom. Place value strips are another tool that is exciting to get but daunting to organize and make student-ready.
 The strips are marked in the same way as the discs – in values of 1s, 10s, 100s, and 1000s. The colors of the places correspond with the discs to help solidify students’ understanding of the value of that number. Even in the Math Mights, our very own Value Pak sports the colors of the discs and strips to help kids remember using the place value strips, whether it be with partial sums, rounding, estimating, place value basics, adding, etc.
Our place value strips come in a student size, which is great for students to have at their table if they’re doing subtraction or anything with partial products. When we first started looking around at tools and getting things from suppliers, we purchased from Crystal Springs Books. They had the demo strips, which are great for teachers to use if you’re modeling or if you want kids to do something in a group on the carpet, but it wasn’t ideal for individual student use at their tables. Many sites sell the demo size place value strips, but we had only seen the student size at Crystal Springs, and when I learned that they were going out of business, I was desperate! I feel so strongly that these are important tools to have in the classroom that Strategic Intervention Solutions has now started to print them! We now have them in a reusable clear bag, and we’re going to be featuring this product this month as it is hot off the press!

How Many Sets Do I Need?
This is a question you’ll have to decide the answer to. With the set of 30 included in the math toolkit, you could create 30 sets with one of each value (1-9, 10-90, 100-900, 1000-9000), or you could put two of every value (1s, 10s, 1000s, 100s) in a set to make 15 sets. It depends on how you want students to use them! You have to be careful with the problems that you’re using because you don’t want to use a value more than once if you’re only going to have one of each value in a student set. So, be thinking about that when you make the decision about how you want to get yours set up in your classroom.
Coding the Sets
As you’ll see in the video, the fact that the strips are on perforated sheets, makes coding them a snap! Instead of writing letters or drawing symbols on each individual strip, our very own Jana Hazekamp showed me that it’s much easier if you take a marker and draw a big line down the center of the sheet BEFORE you detach the strips and have that group be the purple line group. Once you know where the perforation is, just take a variety of different colored makers and start drawing lines! You can do a single purple line, then a double purple line, then a curvy purple line, and then switch colors until you have enough sets.

Then, simply fold the perforations and then tear off the sets and they’re organized very simply. If one falls on the floor, you turn it over, figure out what kind of line is there, and put it back with it’s set. Put a rubber band on the set and it fits nicely in the 4 x 6 boxes right alongside the place value discs.
Decimal Place Value Tiles
For our 4th, 5th, and 6th grade teachers using decimal tiles, you’ll follow the same process as we did with the whole number place value discs.
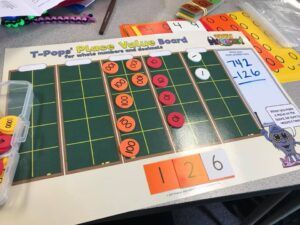
The decimal tiles come in 10ths, 100ths and 1000ths, and are frequently featured in T-Pops’ demos of his place value mat!
I don’t recommend mixing whole number and decimal place value discs because it can become a bit chaotic. However, I do recommend a parallel labeling system, as sometimes you might want to get your tens, ones, tenths and hundredths together. If you have have a single black dot for whole number discs, you could also do a single black dot on a set of decimal discs. That way, you could reorganize your sets to support your unit based on what you’re using. Fortunately, decimal tiles are square so you can easily differentiate the whole number and decimal manipulatives when it’s time to separate again.
The nice part of the decimal tiles is that they also come on a perforated sheet. I put 15 of each value in a set to make it student-ready, so taking a sheet of tiles, fold it in half, flip it over, and mark the back of the tiles before you separate them.

Decimal tiles could also be stored in a 4×6 photo box, as it makes it easy when kids come to the Math Salad Bar. They just grab a whole number box and a decimal box with matching symbols, which also stack nicely, and then are easily carried back to the table.
Decimal Place Value Strips
The process for organizing the decimal place value strips is the same as it is for whole number place value strips. Flip them over and label in the same way that you did the whole number strips – using the same marks, if possible! If you did a purple line group of whole number strips, do a purple line group of decimal strips.
I don’t like to mix decimal and whole number place value strips either because it becomes hard for students to manage. I’d recommend putting the decimal strips in the 4×6 boxes with the decimal tiles.
Bonus Tip!
I also like to put two very small clamp clips in each 4×6 box. Students can use the clips as a stand to clip together their place value strips as they build their numbers with their partners and then set it up like a display on their desks!

In each whole number 4×6 box, you’ll have:
- Whole number place value discs (15 of each value)
- Whole number place value strips (1 or 2 of each value)
- Small clamp clips (2)
The decimal 4×6 boxes will be the same, just the decimal version.

T-Pops Approved!
T Pops likes to use discs and strips with the place value mat because the discs fit perfectly in the grid! If you’re doing addition, you can use discs on discs, and if you’re doing subtraction, you can use discs for the minuend and strips for the subtrahend – both in whole number or decimal.


I firmly believe that manipulatives will not get used if they’re not set up! So often I go into classrooms where a teacher has only set up a few sets, and it’s not nearly as effective that way. It does take time to get your manipulatives organized for student use, but it is time well spent when your manipulatives are ready to support your instruction! We hope you find these videos to be a handy reference – stay tuned for next week when we look at organizing your Fractions Tools!


")
")
")


")
")
")


")


")
")